Mobile Check-in Setup
To begin using a mobile device for check-in, simply follow the steps below. Please note you will need an available check-in license in order to use an iPad/tablet for check-in. If you need to purchase an additional license, or need any additional help, please contact us.
If you are planning on running Express Check-In (allowing parents to check-in via their iPhone), see our Express Check-In Tutorial.
Mobile check-in FAQ’s are available here.
Step 1: Install the App
In the Apple App Store or Google Play Store, search for “KidCheck”, and proceed to download the “KidCheck Admin App” onto your tablet.
Step 2: Sign In and License the iPad/Tablet
In order to run check-in, the iPad/tablet will first need to be licensed. If you need to purchase an additional license, please contact us.
Open the KidCheck Admin App, and enter your KidCheck username and password to login.
iOS/Android
After logging in, tap on the hamburger menu in the left hand corner and select License Management > Create Device License > enter license name and select your campus (ensure that printing and active license buttons are enabled), and then tap Save.
For a video walkthrough on how to license a tablet, click on this link – How-To License An iPad/Tablet
Step 3: Start Check-in
Now that your iPad/tablet is licensed, starting check-in is quick and easy. Return to the main menu of the KidCheck Admin App and select Check-in Station>Select Template/Program> Choose the template or program that you’d like to use for check-in. You’ll then be able to select which ExpressHub/Printer you’d like to use for printing labels.
In order for a label printer to appear in your list of available printers for check-in, it needs to either be connected to a KidCheck ExpressHub or original PrintHub, or be connected to a computer (either Mac or Windows based) that is on your network and has the KidCheck Client running in the background. You are able to connect multiple label printers to the same KidCheck ExpressHub or computer.
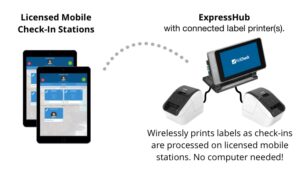
Example Setup #1: a KidCheck ExpressHub (with two printers attached) and two tablets
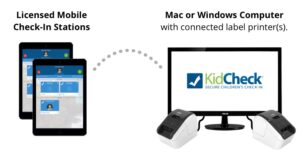
Example Setup #2: one computer (with two printers attached) and two tablets
Note: if you want parents to check-in using their mobile device, you’ll need to activate Express Check-in and configure a KidCheck ExpressHub.